Payoneer is a versatile online payment system that provides a low-cost way to receive payments from direct clients and affiliate marketplaces. With Payoneer, you can easily transfer your funds to your local bank account. If you’re looking to create a Payoneer account but are experiencing difficulties, don’t worry. We’ve got you covered. In this step-by-step guide, we’ll walk you through the process of creating a Payoneer account quickly and easily.
Step by Step process to create a Payoneer Account
Click here to go to Payneer Signup Page, at the signup page click on the SIGN UP AND EARN $25* button.

Note: Here $25 dollar means when you receive $1000 into your account then additional $25 will be creadited.
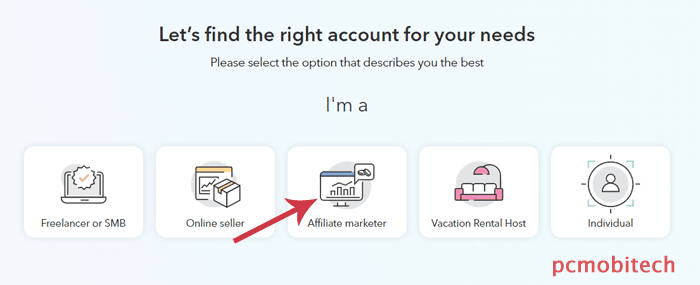
Next, you will need to select your main profession such as Freelancer or SMB, Online Seller, Affiliate marketer, Vacation Rental Host, or Individual. As I want to use Payoneer for Affiliate marketing payment, so selecting Affiliate marketer, means select what describe you the best.
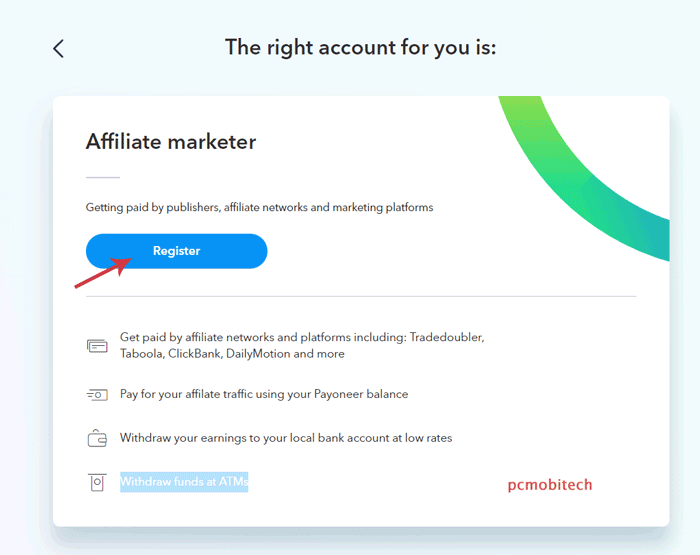
At next page, select appropriate option, for what purpose you going to use Payoneer, as I want to receive payment from publishers, so selected “Get paid by publishers, network and platforms”.

Now you will see account registration page, click on the Register button to continue.
After clicking on Register button you will be redirected to Payoneer Sign Up page. Here, fill the all required information including: Country, Street and number, City/Town, Postal/Zip code and Mobile number.
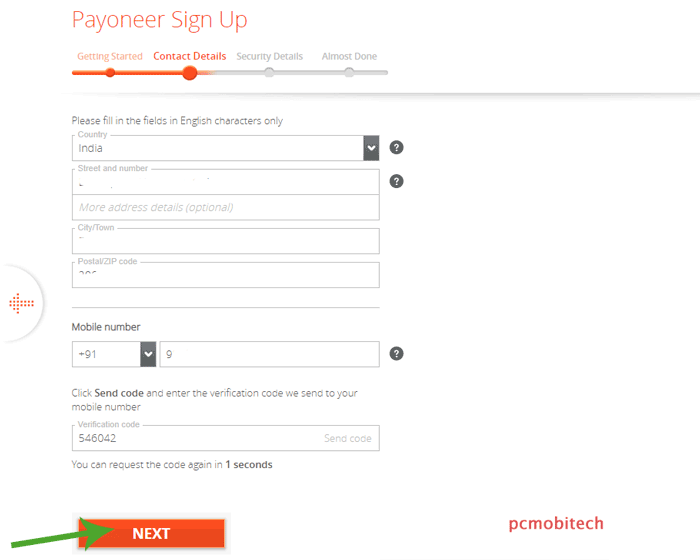
After filling the detail click on the Send code link, so you will receive a Verificaiton code on your registered mobile number. As you recieve the code enter the Verification code box and click on NEXT button to continue.
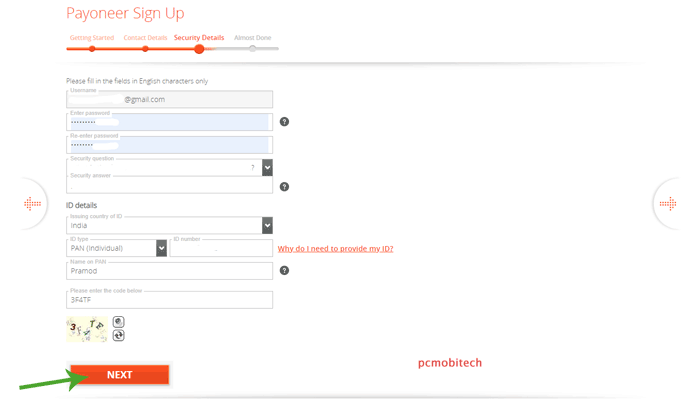
Next, fill the Security Details, such as Email, Password, Security Question/answer, and ID details. Enter the correct details & verify captcha, after that click on NEXT button to continue.
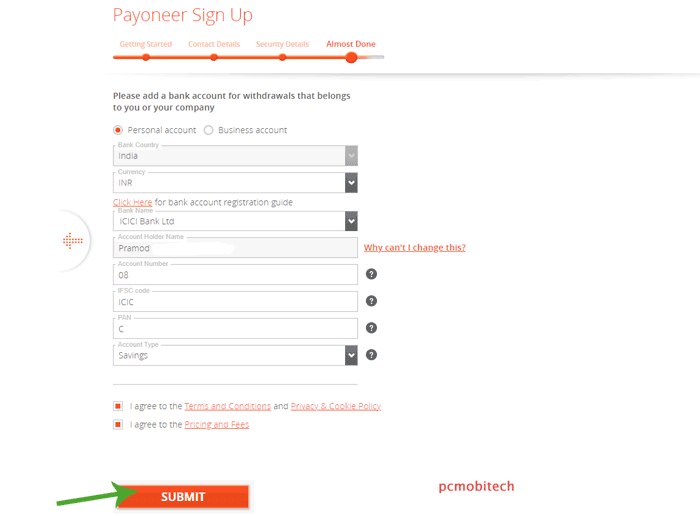
Now, you will need to fill your Bank account information, select Personal account or Business account and then fill the information: Bank country, Currency, Bank Name, Account Holder Name (It will be auto selected because you have submited the ID), Account number, Bank code, Tax ID, Acount Type. After this check the both boxes of agreements and click the SUBMIT button.
Congratulations! your Payoneer account application has been submitted successfully and is now being reviewed.
Note: Your account will be activated in some days but for fast approval login to account and complete other information which is required for Payoneer Account.
Login to complete account creation
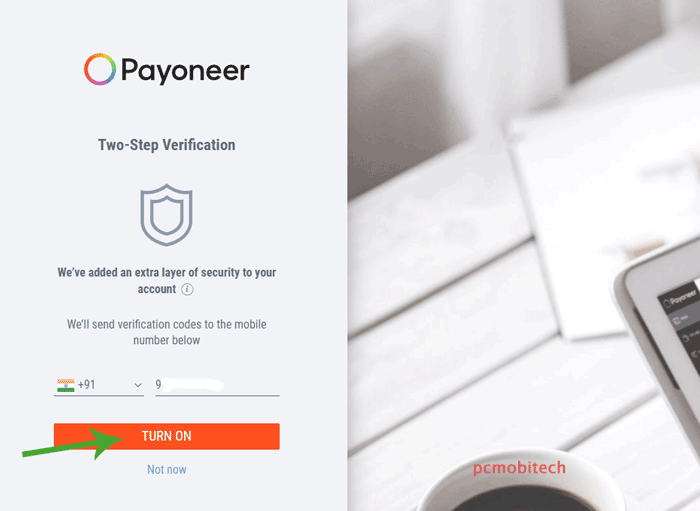
After login, Payoneer will ask to apply an extra layer of security to your account, to enable dual factor security click on the TURN ON button.
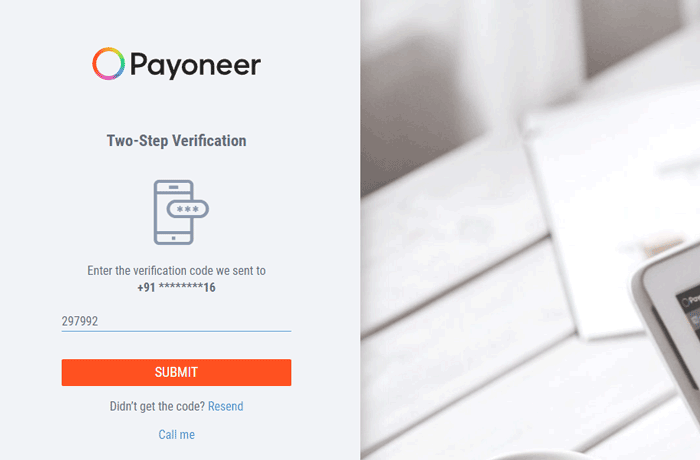
Now you will get an SMS code to your registered mobile number, enter the code to Two-step Verification screen and click on the SUBMIT button.
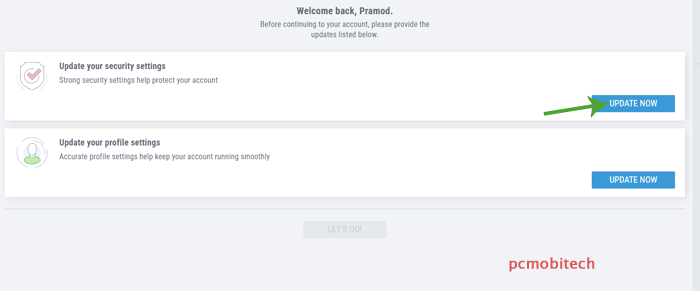
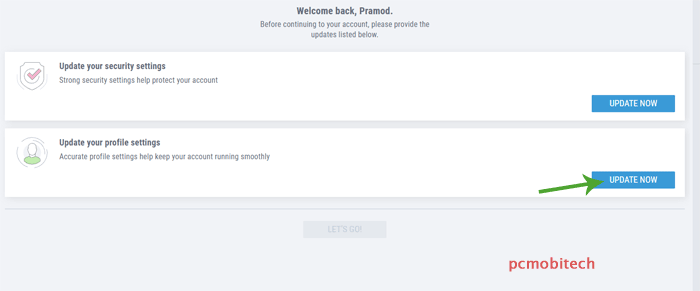
As soon as you logged in first time in Payoneer account, you will need to finalize to security settings and profile settings.
Update Security Settings
To Update your security settings, click on UPDATE NOW button of your security settings.
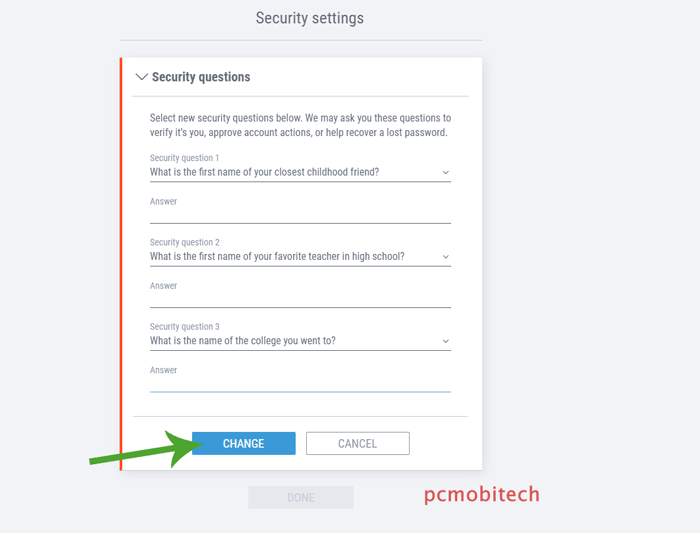
Next, you will need to select 3 security questions, it is necessary to secure your account and for password recovery in case you forget the password in the future. select the question from the list one by one and fill the Answer in the box. And after that click on the CHANGE button.
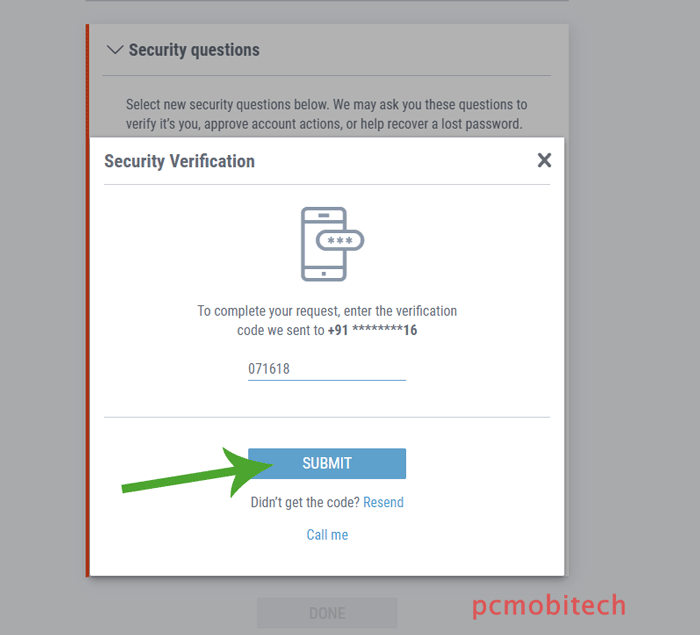
Next for security purpose, a verification code will be sent to your registered mobile number, which you will have to enter security verificaiton screen and then click on the SUBMIT button.
At the next screen click on DONE button to complete security settings.
Update Profile settings
Now, you will need to complete your profile settings, click on the UPDATE NOW button to continue.
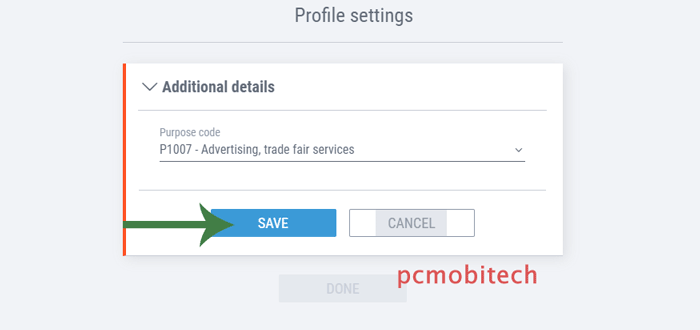
I’m not sure that what additional detail it will ask from you because it is different for every country, for India here I’m asked for Purpose code, my mostly earning comes from Advertising, trade fair services, so I selected P1007 Purpose code. After that click on the SAVE and then click the DONE button.
As you have completed all the required information, click on the LET’S Go! button.
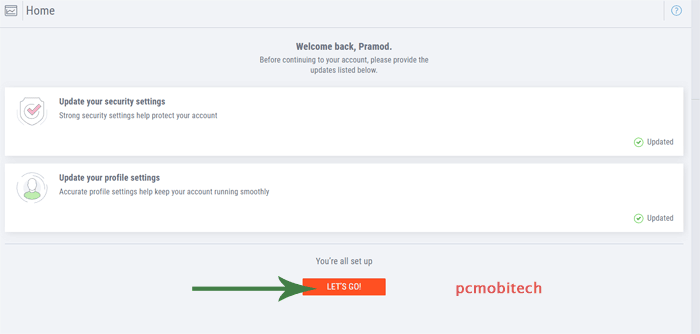
And both notification will be removed from the screen.
Verification Center
After filling Security and Profile information, another Verification center notification will appear at the screen. To complete click on the SUBMIT NOW button.
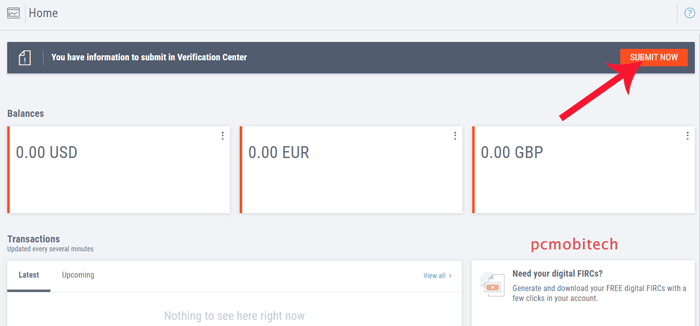
Next, you will have to verify Business detail, provide IEC number (not mandatory), and account verificaiton.
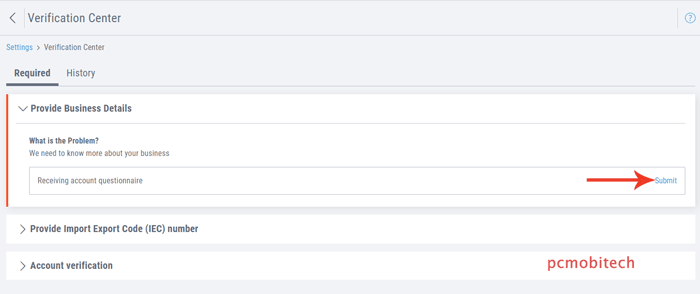
Provide Business Details
Payoneer need more information related to your business, so click on the Submit link to complete detail.
And now simply provide the information about your work, as I’m a website owner and mostly earn from this website so I submitted all the detail of my work, you can provide information according to your work.
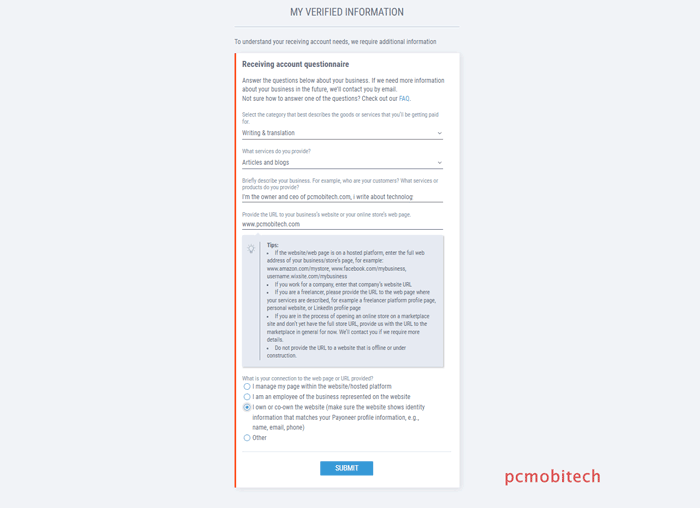
After filling the correct infomation click on the SUBMIT button.
Provide Import Export Code (IEC) number
This information is not mandatory, if you have the import export code number fill it or leave as it is.
Account verification
Here you will need to submit a Government-issued photo ID, which is required to verify your full name, your date of birth, and photo.
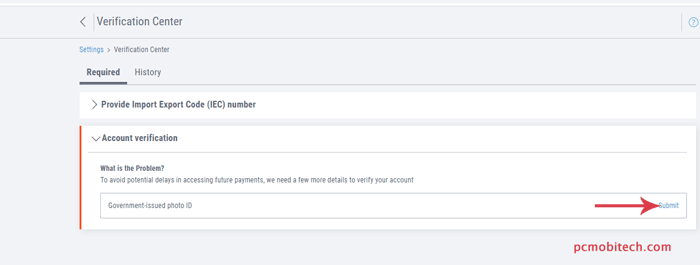
Click on the Submit button and you will see My Verified Information screen. Here select your country/region where your document was issued. After choosing your country it will show you all document type with which you can verify your account.
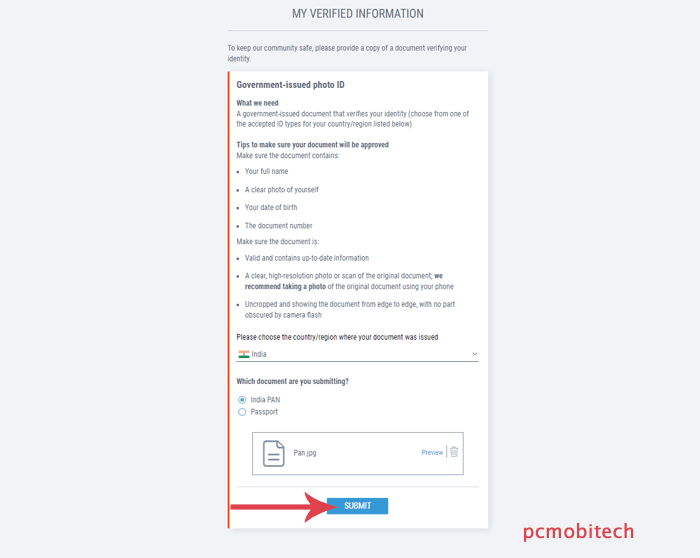
Select the document type from the list and upload a scanned image from your computer and then click on SUBMIT button.
If you have submitted everything correctly, you will receive Payoneer account activation email with in few hours.
When you purchase through links on our site, we may earn an affiliate commission. Read our Affiliate Policy.