Apex Legends has gained immense popularity as a free-to-play hero shooter game that delivers a thrilling competitive gaming experience, where players strive for glory, fame, and fortune. Developed by Respawn Entertainment and published by Electronic Arts, Apex Legends stands out for its distinct roster of characters, exhilarating gameplay that keeps the adrenaline pumping, and intense matches that keep players on the edge of their seats.
Nevertheless, like any other game, Apex Legends is not exempt from encountering occasional challenges. One such prevalent issue that players encounter is the frustrating “Disconnected: Detected Data Mismatch” error, which hinders their ability to connect to the game servers. This problem can be highly vexing and disrupt the overall gaming experience.

How to Fix Apex Legends Disconnected Detected Data Mismatch Error?
Fortunately, we have compiled a list of potential solutions that should be useful in resolving the issue. When it comes to the possible causes, it is highly likely that an outdated game version, corrupted or missing game files, problems with the internet connection, conflicts with networking drivers, issues with DNS settings, conflicts with other installed games, and more can contribute to the frustrating ‘Disconnected: Detected Data Mismatch’ error in Apex Legends.
It is important to follow each method step by step until the problem is resolved. Without further delay, let’s dive right into the solutions to get you back into the game swiftly.
1. Reboot the Computer
To begin with, it is recommended to try restarting your computer, as this can effectively eliminate any temporary glitches or cache-related issues that may be causing the problem. Quite often, a simple restart can resolve a wide range of issues and get things back on track.
2. Update Apex Legends
We highly recommend checking for game updates manually through the Steam client in order to prevent any potential glitches that may arise from using an outdated game version. Outdated game patches often introduce bugs and stability issues, which can be resolved by following the steps outlined below.
To manually check for game updates and address possible glitches through the Steam client, follow these straightforward steps:
- Launch the Steam client on your computer.
- Navigate to your Library section.
- Locate and click on Apex Legends in the left pane.
- Steam will initiate an automatic search for any available updates.
- If an update is found, click on the “Update” button.
- Allow the update process to complete, ensuring that you patiently wait.
- Once the update is finished, proceed to restart your computer.
By doing so, you’ll ensure that you’re running the most up-to-date version of the game, with any potential glitches or stability issues effectively resolved.
3. Verify and Repair Game Files
Sometimes, encountering issues with game launching can be attributed to missing or corrupted game files. To address this, you can follow the steps below:
For EA Desktop App:
- Launch the EA Desktop app.
- Navigate to the Apex Legends section.
- Select Manage and locate the game.
- Click on Repair to initiate the repair process.
- Wait for the repair process to complete.
- Once the repair is done, restart the EA Desktop app.
- Launch Apex Legends again and check if the issue is resolved.
For Steam Client:
- Launch the Steam client.
- Click on Library to access your game library.
- Locate Apex Legends in the list of games.
- Right-click on Apex Legends and select Properties.
- In the Properties window, go to the Local Files tab.
- Click on Verify Integrity of Game Files.
- Wait for the verification process to complete.
- After the verification is finished, close the Properties window.
- Restart your computer to apply any necessary changes.
- Launch Steam and start Apex Legends to see if the problem persists.
4. Check the Internet Connection
In addition, it is advisable to verify your internet connection to ensure that it is stable and not causing any issues. If you are experiencing problems, you can try the following steps:
- Check your internet connection for any signs of instability or poor performance.
- Consider switching between a wired or wireless network connection, depending on your current setup, to see if it improves the connectivity.
- If you are using a Wi-Fi router, you can try performing a power cycle by turning it off, unplugging it from the power source, waiting for a few seconds, and then plugging it back in. This can help refresh the connectivity.
By following these steps, you can address potential internet-related issues that may be affecting your gaming experience.
5. Update the Networking Drivers
Outdated networking drivers on your computer can also contribute to issues with online server connectivity. To address this, follow the steps below to check for and install networking driver updates:
- Right-click on the Start Menu to open the Quick Link Menu.
- From the list, click on Device Manager.
- In the Device Manager window, double-click on Network Adapters.
- Right-click on the networking device and select Update driver.
- Choose the option to Search automatically for drivers.
- If an update is available, it will be automatically downloaded and installed with the latest version.
- Once the update is completed, it is important to reboot your computer for the changes to take effect.
6. Clear the DNS Cache
If your system has accumulated a significant amount of DNS cache data related to internet configuration, it may impact your ability to connect with game servers. To resolve this issue, follow the steps below to remove the DNS resolver cache data from your system:
- Press the Windows key to open the Start menu.
- Type ‘Command Prompt’ in the search bar and locate it.
- Right-click on Command Prompt and select ‘Run as administrator’.
- Click ‘Yes’ to confirm running Command Prompt with admin access.
- Once the Command Prompt window opens, type the following command and press Enter: ipconfig /flushdns
- A successful message will appear, indicating that the DNS resolver cache has been flushed: ‘Successfully flushed the DNS Resolver Cache.’
- Finally, close the Command Prompt window and restart your PC to apply the changes.
7. Change DNS Addresses
If you are experiencing blockage issues with the Apex Legends game server due to your specific DNS address, manually configuring the DNS server addresses on your PC or console can help resolve the problem. Follow the steps below to do so:
- Press the Win+R keys together to open the Run dialog box.
- Type ‘ncpa.cpl’ in the dialog box and press Enter. This will open the Network Connections window.
- Double-click on the Wi-Fi or Ethernet network from the list, depending on your connection type.
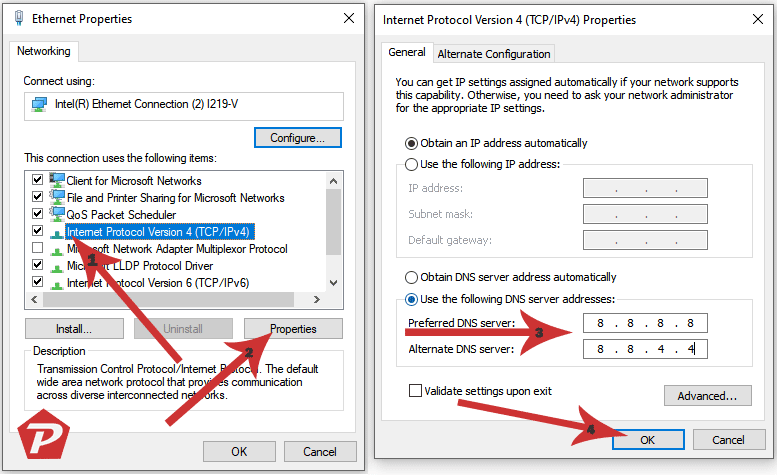
- Click on Properties and then double-click on Internet Protocol Version 4 (TCP/IPv4).
- In the IPv4 Properties window, select ‘Use the following DNS server addresses.’
- Enter ‘8.8.8.8’ for the Preferred DNS server and ‘8.8.4.4’ for the Alternate DNS server.
- Click OK to save the changes.
- It is important to restart your computer to apply the changes.
Using these steps, you can manually configure the public DNS server addresses (8.8.8.8 and 8.8.4.4) to resolve any blockage issues with the Apex Legends game server.
You May also check: Best DNS Servers for Grand Theft Auto V.
We hope this guide has been helpful to you. If you have any further queries, please feel free to comment below.
When you purchase through links on our site, we may earn an affiliate commission. Read our Affiliate Policy.