When you lose your important files due to a corrupted Drive or USB Disk partition. Then you always look for a reliable Data Recovery Software which helps to recover all the lost data. Basically, there are many free and paid data recovery software available for PC but they are not effective as EaseUS Data Recovery Wizard Pro. So in this post, I’ll share step by step guide to recover all lost files using EaseUS Data Recovery Wizard Professional.
Data recovering method EaseUS Data Recovery Wizard Pro
If you’re using the Free version of EaseUS Data Recovery Wizard then you can only recover 2GB of data at a time. But Pro version will help to recover whole data of a drive or device. So I’ll suggest you to use the free version to recover 2GB data or Buy Pro version for full recovery of data files.
Here I’m using EaseUS Data Recovery Wizard Pro version to recover files. You can follow the same procedure with Free version. If You’re looking for Free version of EaseUS Data Recovery then It can be downloaded from >>Here<<
After Download, Double click to run setup and follow the step by step installation and keep remember do not install EaseUS Data Recovery Wizard on the same drive that you’re going to recover. But before starting the data recovery wizard program, you must ensure that the drive or device is properly connected to PC.
- After installation & plugin device to Computer, start the EaseUS Data Recovery Wizard. If the device or drive is not showing in the list then the data recovery wizard can be refreshed by Refresh button. Once you find the corrupted device in the list, click to select and then click on Scan button.
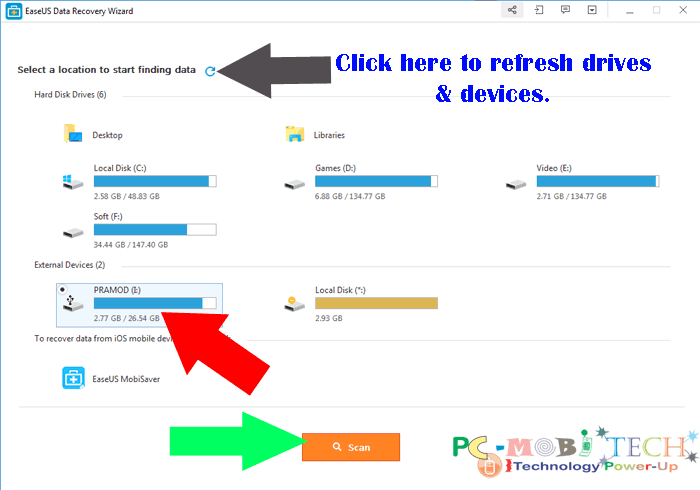
- As soon as you click on the Scan button, EaseUS Data Recovery Wizard starts the scan of the Device or Drive.
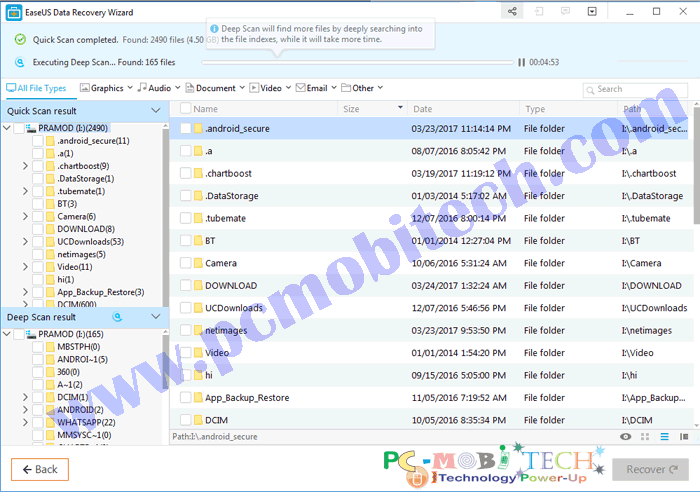
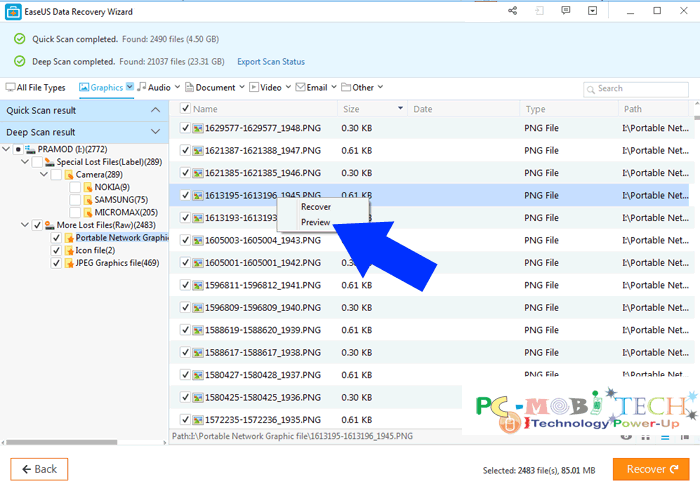
Quick Scan:
First It scans the device using Quick Scan. So The Scan only takes few minutes and gives some basic results. If the file system has been corrupted by a virus then it quickly identifies and shows you search results.
Deep Scan:
In the Deep Scan, Data recovery wizard scans the file system deeply and the scan can take upto 1 or 2 hours (Also Depends on the Device size and speed). The Data Recovery Wizard scans bad sectors on the drive and recovers all the data which is trapped between bad sectors.
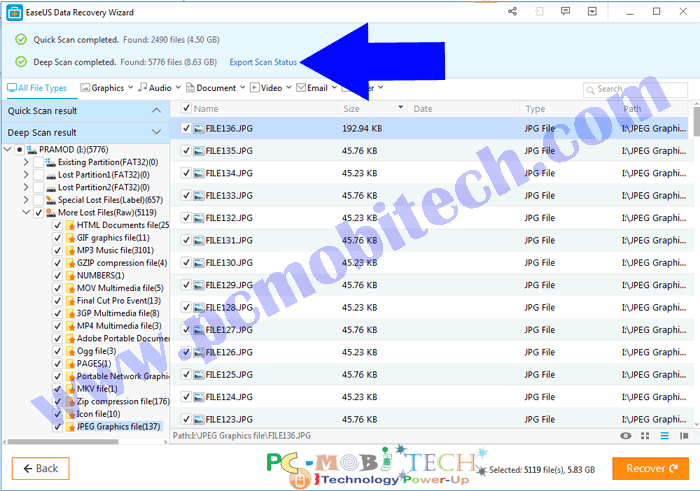
- Once the scanning is completed, you must save the scanning report. It is the most important step, I’m saying this because if you’re recovery data from a large drive then you can’t do this immediately. And If you have saved the file scanning report then you’ll not need to re-scan the device again. So to save the scanning report click on the Export Scan Status link.
Note: The saved scan report will only useful for that computer from that it has been exported. If the report you’ll want to import on another computer, It won’t work.
- You can search for an individual file using the Search box, And by default, it shows All File Types and if you’re searching a special extension type file then it can be selected by clicking on Graphics ∨, Audio ∨, Document ∨, Video ∨, Email ∨, Other ∨ drop-down menu buttons. For example, you want to recover all .PNG files then click on the Graphics “∨” drop-down menu button and select the extension .png, After selecting .png extension type now EaseUS Data Recovery Wizard will only show .PNG files in the list.
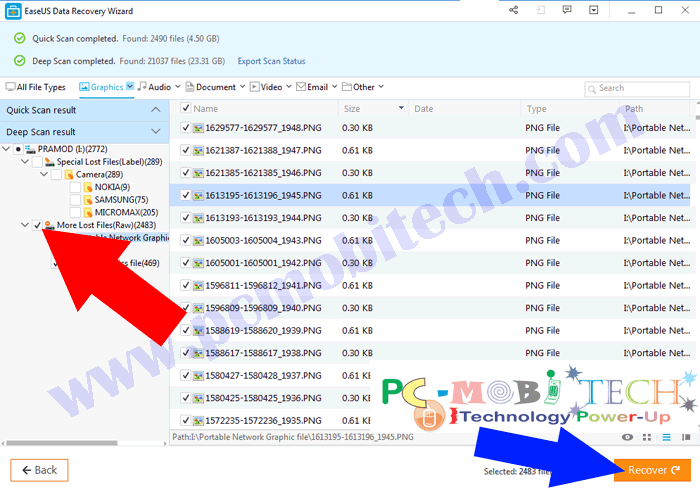
- If you want to recover complete disk drive then you’ll only need to select main drive check box. When you have selected all your files, you can recover the file by clicking on the Recover button. And when you click the Recover button, It will ask you to select a drive or folder to save the data files. So choose a right place that has enough space for the data recovery.
- You can also recover or preview a single file by right-clicking on the specific file from the list without using Recover button. As soon as you right click on the file, a menu will appear and select an option Recover or Preview from the context menu.
Import an export saved scan file
To Import an exported scan file, at the main screen of the EaseUS Data Recovery Wizard click on the Import Scan Status button which will available in the Title bar. After clicking on Import Scan Status button an explorer window will open and you’ll need to select the file from the saved place.

I have covered mostly features and recovery related questions, in case if you have any suggestion please tell us via Comment box.
Buy EaseUS Data Recovery Wizard Pro with 30% discount:
If you use below link to buy EaseUS Data Recovery Wizard Pro then a 30% discount coupon will be automatically applied for you. And also you will get the cheapest price if compare to other sites.
Buy EaseUS Data Recovery Wizard Pro »
If the discount coupon is not working, Please leave a reply in the comment box, we will fix this as soon as possible.
When you purchase through links on our site, we may earn an affiliate commission. Read our Affiliate Policy.


This article is really helpful for anyone who might have accidentally deleted important files. The instructions are very clear and easy to follow
But Free trial can’t even recover those 2gb as they say, so why would paid version then recover anything? I belive Easeus is fake.