You use domain Email account with free Webmail service, which is provided by your Web Hosting company. And you regularly need to check emails by login to Webmail and entering Email ID and Password. Email check takes lots of your time. So if you want to save your time then you can try a premium email service from Google for just $2.25. click here to check G-Suite price.
Or you can use Windows 10 mail app for free. Windows 10 comes with preinstalled windows mail app. This app provides an easy to use interface to receive and send emails from your Domain Email account. Windows 10 mail app also supports POP3 and IMAP4 protocols to access Email. It provides the easy configuration with which you can easily setup your domain emails account and gets emails directly into your Windows 10 mail Inbox. But for this, you will need some of your web hosting server information. So if you are a blogger or website owner & have a Windows 10 Computer and Laptop then you can easily setup yourname@domain.com account with Windows 10 mailing app.
Windows 10 Mail Configuration for Domain Email Account
To configure Domain Email with Windows 10 mailing app follow the steps below:
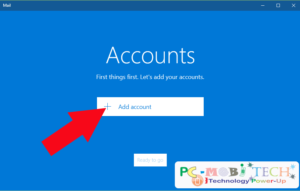
Launch Windows 10 mail app and click on “+Add account” button.

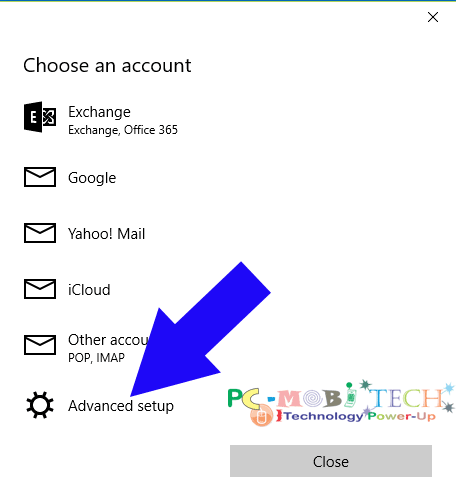
On next Choose an account box will appear. Now choose “Advanced Setup” option from the list.
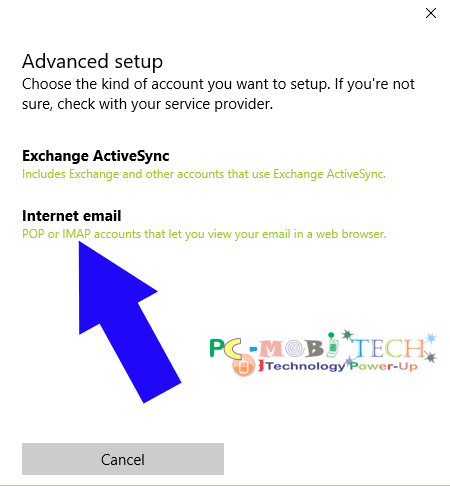
In “Advanced setup” dialog box choose “Internet email” option.
“Internet Email account” dialog box will appear where you will need to enter your domain Email account information and Incoming and Outgoing (SMTP) server information. To get this server information:
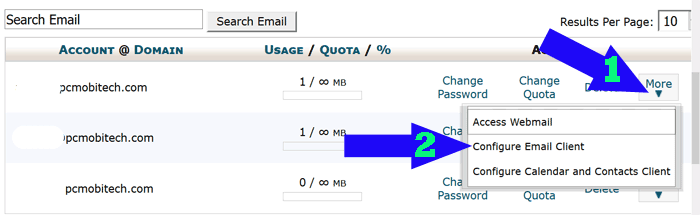
- Login to your CPanel account.
- After Login click on Email Accounts option.
- In the Email Accounts Click on More∇ option and choose “Configure Email Client” option from the menu.
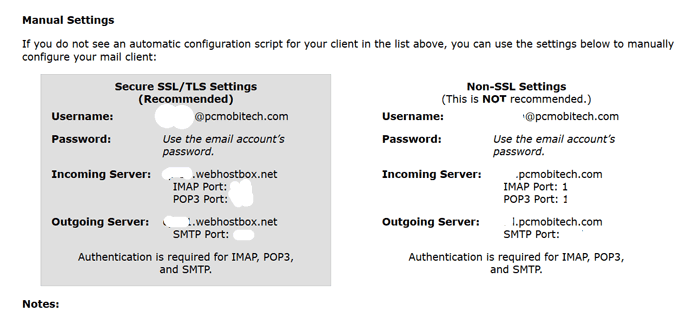
- Now you’ll see “Mail Client Configuration for “Domain E-mail account” “. Under the “Manual Settings” you will see two settings Secure SSL/TLS Settings and Non-SSL Settings. SSL/TLS based settings are the best for security because with SSL/TLS connection mail will be delivered to your computer over a Secure encrypted connection. So first use SSL/TLS based Incoming and Outgoing Server. Copy your username, Incoming Server, and Outgoing Server information and paste it into a notepad file.
Now in “Internet email account” fill your domain email account information:
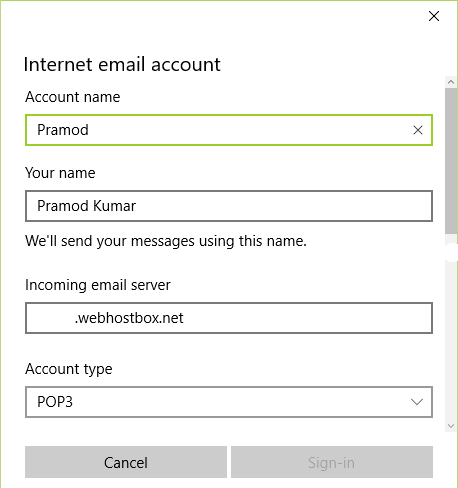
- Account name: Your Account Name.
- Your Name: Your Actual Name, Your message will be sent along with this name.
- Incoming email server: Enter Incoming email server address, which you have got from C-Panel (eg: gator4041.hostgator.com)
- Account type: Choose your account type between POP3 and IMAP4. Basically, your email host provides both protocol service and you can choose any of one from them.
Now scroll the box and fill following information:
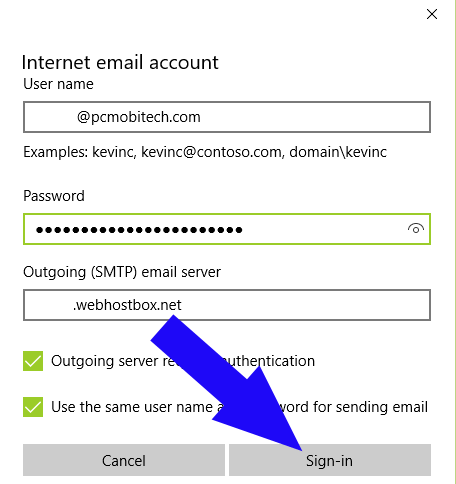
- User name: Enter here your email address (eg: kumar@pcmobitech.com)
- Password: Your email account password.
- Outgoing (SMTP) email server: Enter here Outgoing email server address.
After filling all the information, click on “Sign-in” button. And you’ll get an All done! Your account was set up successfully message for your Email account configuration. Click on Done button to Continue.
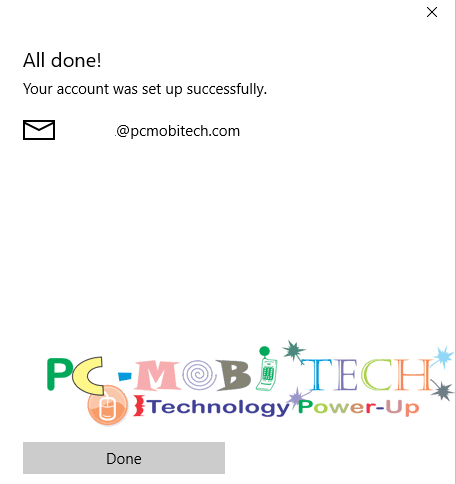
Now your domain email account is ready to use with Windows 10 mail app. If you want to Add more account then again click on +Add account button to add more email accounts otherwise click on Ready to go button to continue to Inbox.

That’s it, Now you have been successfully Configured your domain email account with Windows 10 mailing app. For Any query about the setup, leave a reply in the comment box.
Also See:
- How to Get Gmail account emails directly to Windows 10 mail app.
- How to change default downloads folder location in Windows 10
When you purchase through links on our site, we may earn an affiliate commission. Read our Affiliate Policy.