When we click a Photo using DSLR Camera or a Smartphone, the Photo size always goes in MB’s. Sometimes the photo size goes beyond 10MB. But the problem of high-quality photos or images, we can’t immediately share to the web because if we upload a photo in that size, then the page size also increases. Therefore, many sites restricted the size and quality of the Photo.
If you’re a web owner, running a Blog or Website the quality and size of the image will always matter for you. Think about a web page containing an image having the size approx “5MB” and the same page contains the compressed image then the page size is only “1MB”. It this case, would you want to go to “5MB” size page? Generally no, because it is huge and as well as not the SEO friendly?
So if you have CorelDRAW Graphic Suite installed on your Computer, all images can be optimized/compressed without losing any quality. You’ll be surprised be when you see a picture is in size 500KB will be compressed to 100KB, but the quality remains the same.
Resize or Reduce Image size for Web use using CorelDraw
Using this method you can optimize & resize an image without losing quality, Including PNG, JPG or JPEG, and Bitmap. If you want to make a picture smaller, then just follow these steps to get reduced image size.
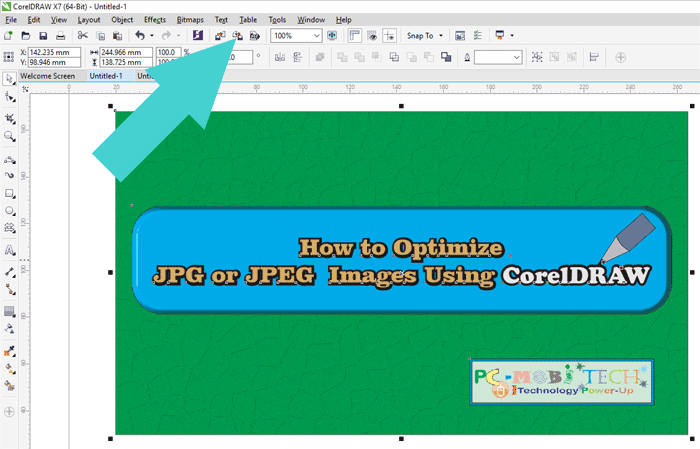
- First Open the CorelDRAW into your PC. You can create an image, in case you have taken the pictures from Camera or it is saved on the Computer Disk then it can be imported into CorelDraw using the Import command (It is available in the File Menu> Import, also available in the Standard Toolbar), or you can use file drag and drop option. After creating or importing the photo, you’ll need to use its Export command. The Export Command available in the File Menu > Export, as well as on the Standard Toolbar.
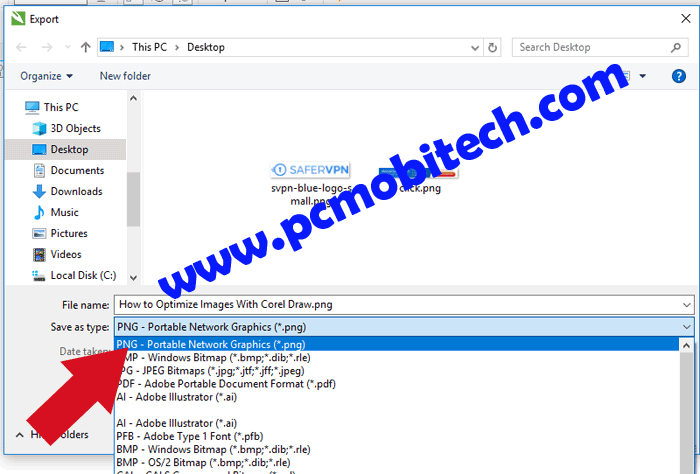
- Next Export dialog box will appear, here you’ll need to select the file extension before export. So choose a necessary file format from Save as type drop-down list. For example, here I’m selecting PNG – Portable Network Graphics (*.png) extension. After choosing click on Export to continue.
Please Note: Above described two steps would also be same for other file extensions. So If you’re going to Compress JPG – JPEG or BMP images then you’ll need to select the appropriate extension from above Save as type list and will need to follow below points.
Must See:
Compress PNG Photo or Image
As First, I have selected PNG file format for optimizing image size, here I’m giving detail settings with which you can export a high quality Compressed image, which will be of tiny size.
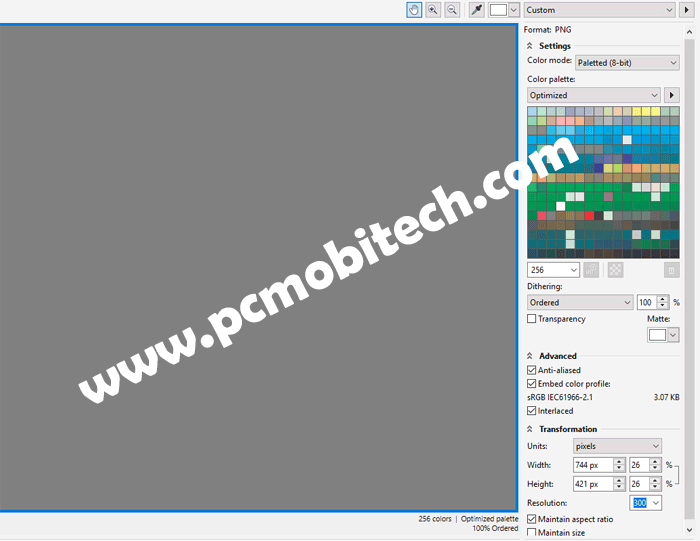
PNG Settings:
- Color mode: Paletted (8-bit)
- Color Palette: Optimized
- Total Colors: 256 or 128
- Dithering: Ordered (100%)
- Transparency: Unchecked (You can also enable this option if you have a transparent background).
PNG Advanced Settings:
Leave these as default, if you don’t want to reduce more quality
- Anti-aliased: Checked.
- Embed color profile: Checked
- Interlaced: Checked.
PNG Transformation.
Units: CorelDRAW supports approx 15 unit types, so you can select the unit that you prefer to use. For example, I’m choosing here Pixels unit because the exported image will be used for Web, and Computers & mobiles screen resolution mainly focused on pixels of the screen. If you want to export the picture for other purposes, then you should choose Inches, Millimeters, Centimeter, Feet, etc.
- Width: Just enter the appropriate size of the Photo or Image. And other options leave it as it is…
- Height: I will be automatically changed when you select the Width. If you change the Height, then Width will be settled according to the Height of the Photo.
Resolution: Leave it as it is. (300)
- Maintain aspect ratio: Check.
- Maintain Size: Uncheck.
After implementing the given settings click on OK button to Save the image to the Computer Drive.
Compress JPG or JPEG Photos/Images
After selecting JPG – JPEG Bitmaps (*.jpg,*. jtf, *.jff, *.jpeg) image format from Save as type drop-down list. You’ll get Export to JPG settings dialog box. Use below settings to reduce image size.
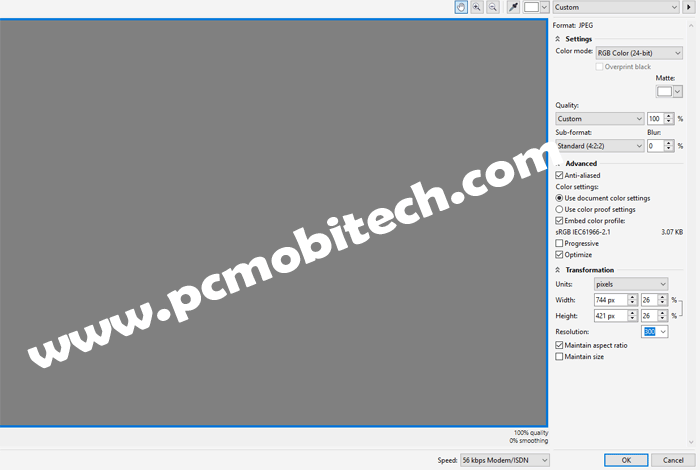
JPG Settings:
- Color Code: Select RGB Color (24-Bit), Don’t use CMYK Color mode otherwise image size will be increased too much.
- Matte: Don’t make any change.
- Quality: Set to 100% because JPG or JPEG image format is a lossy file format, so when you set this below than 100%, the quality of the image will also reduce.
- Sub-Format: Default Set.
- Blur: Leave it as it is.
JPG Advanced Settings:
- Anti-aliased: Check the box.
- Color Settings: Use Document Color Settings.
- Embed Color Profile: Check the box.
- Progressive: Uncheck this.
- Optimize: Enable this.
JPG Transformation:
- Units: Use Pixels from the list, it is much better for Web Publishing. For other purposes, you can select Inches or Centimeters unit.
- Width: To resize image or Photo, enter the required value. The Photo Height will be adjusted automatically.
- Height: Don’t change this because it is adjustable according to image width. If you make any change in this, then the photo width will also be replaced.
- Resolution: 300
- Maintain aspect ratio: Tick the Checkbox.
- Maintain Size: Uncheck the box.
After completing above settings click on OK button to Save the photo to the PC.
Compress Bitmap (BMP) Photo/Image using CorelDRAW
If you would like to Export Bitmap (*.bmp) photo/image using CorelDRAW then after selecting BMP – Windows Bitmap (*.bmp, *.dib, *.rle) from Save as type drop-down list box, use following steps to get the optimized image.
Convert to Bitmap
Once you click on the Export button after choosing the file format, you’ll see Convert to Bitmap Settings dialog box: Apply below Settings to compress image
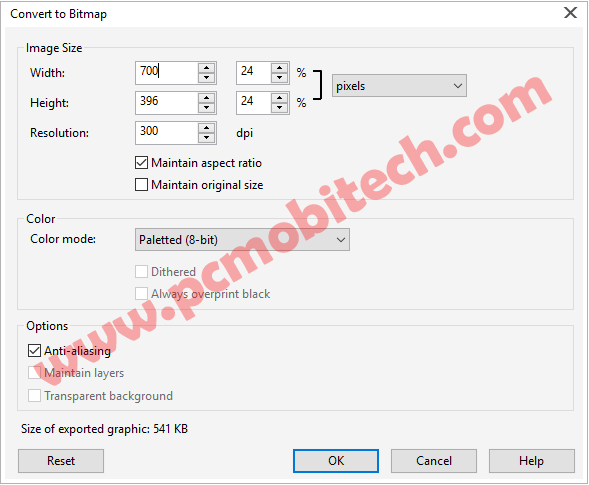
Bitmap Settings:
Image Size:
- Width: Enter the value of the Width and Height will be automatically changed.
- Height: If you enter the Height of the image then Width will be automatically adjusted.
- Resolution: Leave it as it is.
- Maintain aspect ratio: Tick the checkbox.
- Maintain original size: Untick the checkbox.
Color:
- Color Mode: Paletted (8-bit) You can also select 24-bit colors if you want more quality in the Image.
- Dithered: Uncheck this.
- Always Overprint Black: Uncheck this also.
Options:
- Anti-aliasing: Enable the Checkbox.
- Maintain Layers: Leave it as it.
- Transparent Background: Leave it as it.
After selecting all the options click on OK button for going next step. On Next Convert to Paletted box will appear on the screen. Use following options to get better quality in Compress mode:
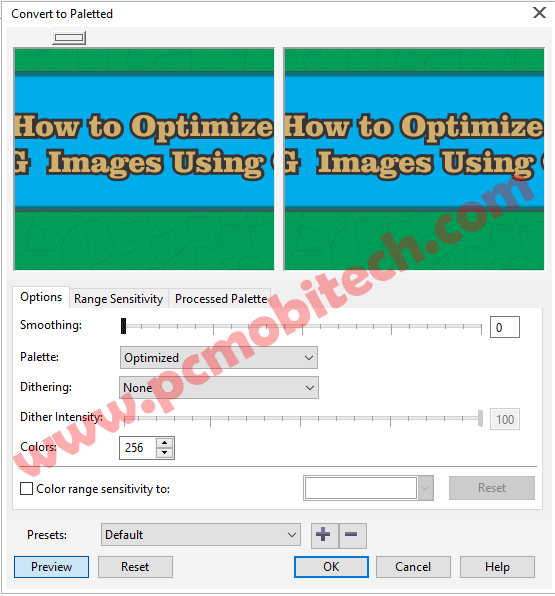
Convert to Palleted Options tab:
- Smoothing: 0 (Zero)
- Palette: Optimized.
- Dithering: None
- Color: 128 or 256.
- Color range sensitivity to: uncheck the box.
- Presets: Default.
After making necessary changes, click on OK button to export the photo to the Computer drive.
You May Also Like:
Now you can understand, How you can Compress/Optimize/Resize PNG, JPG, BMP image or Photo with CorelDRAW. It is not limited because there are some other Image formats also available in the CorelDRAW Save as type list, that you can also try to optimize using CorelDRAW Graphic Suite software.
When you purchase through links on our site, we may earn an affiliate commission. Read our Affiliate Policy.


Great.
you have video, for easier understanding.
thanks.
Really like the article because these tricks are really great for every web developers. Optimizing images is really challenging so please keep posting such articles.