Google Pay is a secure UPI-based payment application that enables you to effortlessly send money from your bank account to others’ accounts. With a wide range of features, it offers similar functionalities to those found in the BHIM app. The app’s association with the trusted brand Google instills a higher level of confidence and reliability among users compared to other UPI-based apps.
When considering the utilization of a UPI app, the initial step involves installing and activating it on your iOS or Android device. In this article, we will guide you through the simple steps to install, register and activate the Google Pay app on both iOS and Android devices.
Google Pay Payment UPI app: Registration and Activation
To install the Google Pay payment app, simply navigate to the Google Play Store for Android devices or the Apple App Store for iOS devices. Once there, locate the app and tap on the “INSTALL” button to initiate the installation process.
Register Google Pay On iPhone/iOS
You can follow these steps to register and activate Google Pay App on iPhone/iOS:

- After successfully installing the Google Pay app, open it on your iPhone. You will be greeted with a “Welcome to Google Pay” screen. Tap on the “Allow” button when prompted if you would like to receive notifications from Google Pay.
- Select the Language that suits you best and choose your Country from the available options (India, Singapore, United States). Then, enter the mobile number that is registered with your bank account. Make sure to enter the correct mobile number associated with your bank account. Tap on the “Continue” button to proceed.
- On the “Choose an account” screen, select the Google account with which you want to register your Google Pay app (if you have multiple Google accounts on your device). Otherwise, simply tap on the “Accept and continue” button.
- You will now see the “Verify your phone number” screen. Enter the verification code that you received on your mobile number from the previous screen. Once you enter the OTP (One-Time Password), your mobile number will be automatically verified.
- After successful registration, you will be taken to the main screen of the Google Pay app. To get started, you need to connect the app to your bank account. Tap on the “Add bank account” button.
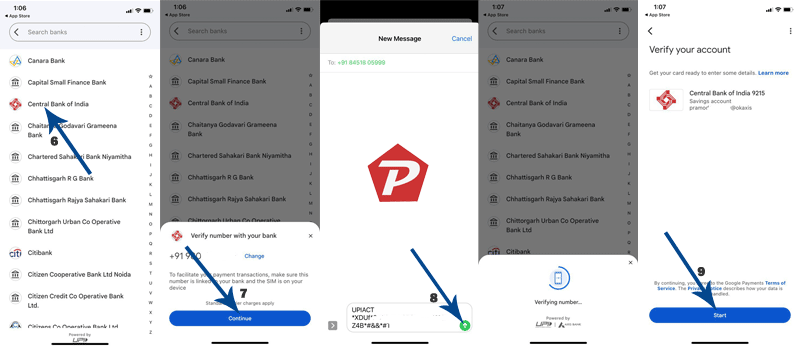
- On the next screen, you will see a list of banks in your country. Select the bank you want to connect with the Google Pay app. Please ensure that the mobile number registered with the bank matches the one verified in the Google Pay app. If necessary, you can change the mobile number on the verification popup screen. Otherwise, tap on the “Continue” button.
- Your iPhone will attempt to send an SMS. Tap on the “Send” button to continue. The Google Pay app will then verify your mobile number with the bank and retrieve your account details.
- The “Verify your account” screen will appear, showing your account and a UPI ID created for your Google Pay app. Tap on the “Start” button to proceed.

- Next, you will see the “Enter your Debit/ATM card information” screen. Enter the last 6 digits of your debit card, followed by the expiry month and year. Tap on the “Next” button.
- The “Create a UPI PIN” screen will appear. Tap on the “Create PIN” button. A 6-digit OTP will be sent to your registered phone number. Enter the OTP on the screen and tap on the “SUBMIT” button located at the bottom right corner.
- Enter your 4-digit card PIN and tap on the “SUBMIT” button. This is the PIN you use for your debit/ATM card on an ATM machine.
- The “Set 4-digit UPI PIN” screen will appear. Choose a new 4-digit UPI PIN, which will serve as your password for Google Pay payments. Tap on the “SUBMIT” button. Confirm the UPI PIN by entering it again on the next screen and tap on the “SUBMIT” button.
- If you have entered all the PINs correctly, you will see the “Bank account added: You’re set to make payment” screen.
That’s it! You have successfully registered your account with the Google Pay UPI app in iPhone
Register Google Pay App On Android based Phone
Here are steps to register the Google Pay app on an Android-based phone:
- Install the Google Pay app from the app store.
- Open the app and select your preferred language on the “Welcome to Google Pay” screen. Tap “Next >” to proceed.
- On the next screen, enter the mobile number registered with your bank account. Tap the “Next” button at the top right.
- Grant the necessary permissions by tapping the “Allow” button three times to verify access permission.
- On the “Choose an account” screen, your name, email account, and mobile number will be displayed. This information is automatically selected from your phone’s registered Google Account. You can add a different email account by tapping the downward arrow icon. Verify all the details and tap “CONTINUE”.
- A verification code will be sent to your registered mobile number. If the number is on the current phone, it will be automatically verified after receiving the code. Otherwise, you can enter the code manually if the number is on another phone.
- On the next screen, select a security method to protect your transactions on the Google Pay app. You can choose to use your screen lock or create a Google PIN. If you select screen lock protection, tap “Continue” and verify your existing face, iris, fingerprint, pattern, or PIN lock protection to confirm security.
- After verifying the lock protection, the app will provide instructions on how to use it. Tap on the highlighted area to activate the Google Pay app successfully.
- The Google Pay activation is now complete, but you need to add a bank account. Tap on the “+ ADD BANK ACCOUNT” option.
- A list of banks will appear on the next screen. Select the bank where your mobile number is registered. Note: If you choose a different bank, the app won’t be able to register your account. Make sure to select the bank with the same mobile number that you used to register the Google Pay app.
- Grant the app the necessary permissions by allowing the “Manage phone calls” permission.
- On the “Find Bank Account” screen, select the SIM slot (SIM 1 or SIM 2) where you have inserted your SIM card with the registered mobile number. Tap “OK” to send the SMS.
- A message will be sent to your bank’s server, and if you have chosen the correct number, the UPI PIN verification screen will appear. If you have not created a UPI PIN before, you will need to verify your debit card and mobile number to create one. If you have already created a UPI PIN, you will need to verify it here. Tap “ENTER UPI PIN” to input your PIN.
- On the “ENTER UPI PIN” screen, enter your actual UPI PIN and tap the blue tick (√) button.
- After successful PIN verification, the bank account will be added to your Google Pay UPI app.
These steps should guide you through the process of registering the Google Pay app on your Android-based phone more effectively.
Check more: How to Send Money Using Google Pay App?
If you have any questions regarding the Google Pay app, please feel free to ask in the comment box.
When you purchase through links on our site, we may earn an affiliate commission. Read our Affiliate Policy.