How to Record Videos With Oracle VM VirtualBox? Oracle VM VirtualBox is a versatile virtualization software that allows users to run multiple operating systems on their existing Windows, Mac, Linux, or Oracle Solaris machine. With VirtualBox, developers and programmers can test software across multiple platforms on a single machine, which can save them time and resources.
One of the newer features of Oracle VM VirtualBox is the ability to record videos using the Video Capture option. This feature allows users to record their virtual machines’ screens and save them as video files. It’s useful for creating tutorials, demos, or simply for recording a virtual machine’s behavior for later analysis.
More from VirtualBox:
- How to Install a Guest OS in Oracle VirtualBox?
- How to Enable-Disable Internet in VirtualBox?
- 3 Easy ways to share files, folders & drives in VirtualBox.
Record Videos in VirtualBox Without Any Software
To record a video using Oracle VM VirtualBox, you first need to start the virtual machine you want to record. Once the virtual machine is running:
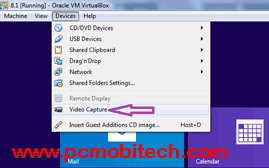
1- Click On Devices Menu & Click on “Video Capture” Option

2- If You want to stop Video recording then again click on “Video Capture Option” in Devices menu.
How To Check Video recording started or not?
While Video Capture option running a video icon spinning in the status bar.
![]()
How to Change Video Capture setting?
1- Right Click on video recording icon in status bar.
2- Click on Video Capture Setting.
![]()
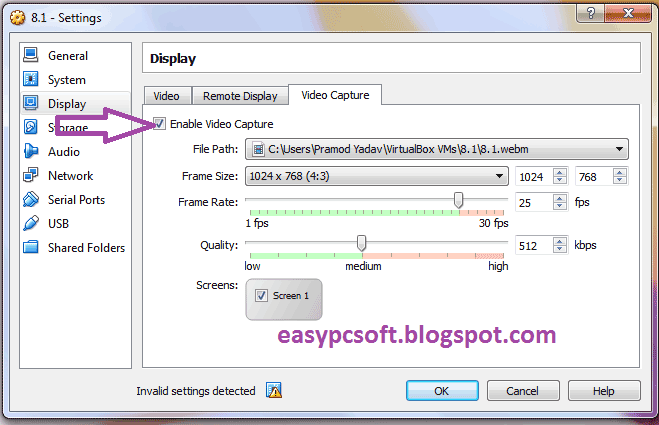
3- On Video Capture Tab Click on “Enable Video Capture“.

4- Change Setting-
(1) File Path: Here you can choose file path, where you want to save your recording file.
(2) Frame Size: Choose your resolution of Screen size.
(3) Frame Rate: Choose Frame Rate Per Second.
(4) Quality: Choose video capturing quality. If you want to good quality video then choose high.
(5) Screen: This option must be enabled before start video Capture. For enable this option click on Screen 1 Checkbox.
Any problem or suggestion please leave a reply in the comment box.
When you purchase through links on our site, we may earn an affiliate commission. Read our Affiliate Policy.


I got .webm video recorded, but no .opus sound, while I was able to choose this option in VBox 6.0.8 on Windows. Maybe I could try little newer version like 6.1 but I wanted to save time time and did not download the newest. BTW I checked the level of my Microphone in Configuration Screen. VBox should do what it pretends to be able to, or say what’s wrong or why it is not possible, to my opinion, so that we can work it out.
This simply doesn’t work for me. I’ve followed every step in this guide and also in others I’ve found.
It generates a 1kb .webm file which sticks at between 250-264 bytes. I’ve tried it on two different Windows 10 host machines and the same thing happens on both.
The film reel spins happily away pretending to be recording the screen but it’s not actually doing anything.
It’s a shame because this would be an extremely useful feature if it worked properly.
I has the same problem – .webm file with 1KB and nothing. It is a bug or feature?)