Oracle VirtualBox helps to run multiple OS at the same time on a single Computer Desktop or Laptop. VirtualBox is based on Virtualization technology, when you install a new Guest OS (Operating System) in the VirtualBox, then all the operating system files install inside a Virtual Disk Image (VDI) or Virtual Hard Drive (VHD), so it doesn’t mess another operating system files into main OS. Hence, VirtualBox is one best solution to install & run single or multiple Guest Operating Systems on a single PC.
Before installing any Guest OS including Windows, Linux, Solaris, BSD, IBM (OS2), Mac OS X and many others in the VirtualBox Virtual Machine, you need to understand some its basic installation instructions, so when you follow below steps, you won’t face any trouble after finalizing full setup.
VirtualBox Guest OS Installation Instructions:
VirtualBox offers two Guest OS setup mode (1) Expert Mode (2) Guided Mode. By default, when you start creating a Virtual Hard Disk, then it begins with Expert Mode, if you can’t understand the Expert mode then Guided mode will be easy to setup, but we will continue with Expert Mode because we have much better control on this than Guided Mode. So follow all below step by step points to install Guest OS in VirtualBox.
1) First Start the Oracle VM VirtualBox Manager using desktop Icon or from Start Menu. When Oracle VM VirtualBox Manager screen appears, click on the new icon from the top left screen. Now Create Virtual Machine dialog box will appear where you can select following things:

Name and operating system
- Name: Give an Operating System Name, you can choose any name that you want.
- Type: You can select any Guest Operating System from Microsoft Windows. Linux, Solaris, BSD, IBM (OS2), Mac OS X and others.
- Version: In this dropdown list, you will see all supported OS series version, which is related to Company, suppose you have selected Microsoft Windows from the Type dropdown list menu, then from the Version list menu you can select the Microsoft Windows related release version such as Windows XP, Vista, 7, 8.1, 10, etc.
Memory size:
When you chose any OS version then VirtualBox will automatically select the necessary value of the Memory, or if you want to increase or decrease the allotted memory size, it is also possible using memory size slider. If you don’t know how much memory is needed by the selected OS? then you can read OS developers site to check the minimum requirement for running the OS smoothly.
Hard disk
- Do not add a virtual hard disk: Select the radio button if you don’t want to add a virtual hard disk.
- Create a virtual hard disk now: You can create a new Virtual Hard Disk, best option if you’re installing a new Guest OS.
- Use an existing virtual hard disk file: If you’re reinstalling Virtual and want to add previously created VHD or VDI image then you can choose this option.
After selecting required settings, click on the Create button.
2) Next, you’ll see Create Virtual Hard Disk dialog box. Here you can settings-up Virtual Hard Disk:
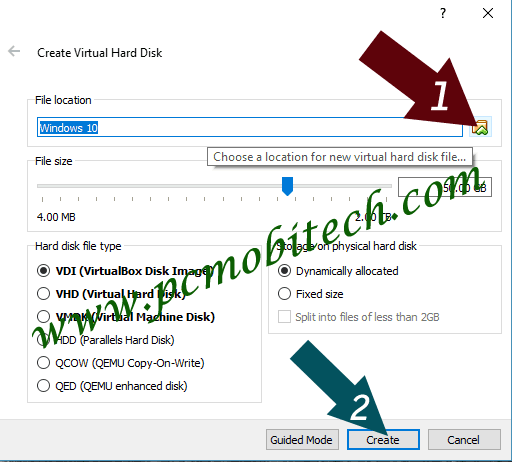
File location:
Here you can enter a different Virtual Hard Disk storage location. Suppose your C drive is full or it has low storage problem then you can save the VHD file on a different drive. To save the VHD on a custom place, you can enter the full path of the location. Alternatively, you can use Choose a location for new hard disk file… icon.
File Size:
You can use File size slider to increase or decrease the VHD size. It is only useful if you select Fixed size radio button from the Storage on physical hard disk section. If you choose the dynamically allocated option, then the hard drive size will automatically decrease and increase continuously.
Hard disk file type:
Using this option you can create & save the VirtualBox Disk Image file to different format. Such as VHD (Virtual Hard Disk), VMDK (Virtual Disk Machine Disk), HDD (Parallels Hard Disk) QCOW (QEMU Copy-On-Write), QED (QEMU enhanced disk). So later these disks can be used with other Virtual Machine software eg: VMWARE, Parallel Virtual Machine, etc.
Storage on physical hard disk:
Dynamically allocated: Select this if you want that VirtualBox automatically increases or decrease the size of the Virtual Drive size. It is most popular and widely used option, and we also recommend you to select this option because when you install new software into the Guest OS then Drive size will be increased, so Virtualbox will adjust the virtual drive size automatically as OS required.
Fixed Size: We recommend this only when you will not install the unwanted software, suppose you want to use the installed Guest OS only for specific software and once you installed it and will continue use then it won’t needed any extra space on the drive.
- Split into files of less than 2GB: This option will help to split Virtual Hard Drive into 2GB part each. It is the best option if you’re using the FAT32 file system on the physical drive.
Once you select all the correct options, you can continue to setup by clicking on the Create button.
3) Now Virtual Hard Drive has been added to the Oracle VirtualBox Manager. To continue setup click on the Virtual Drive name and click on the Start icon.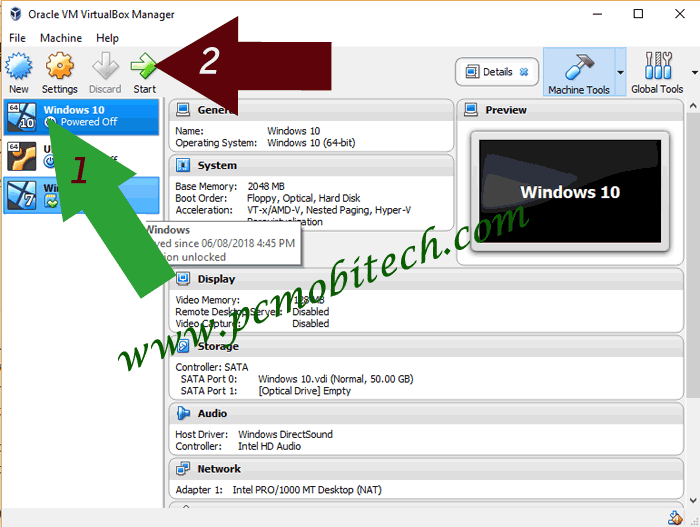
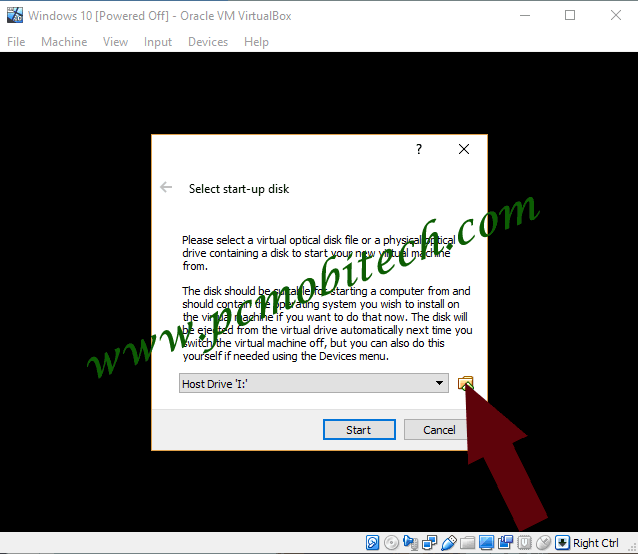
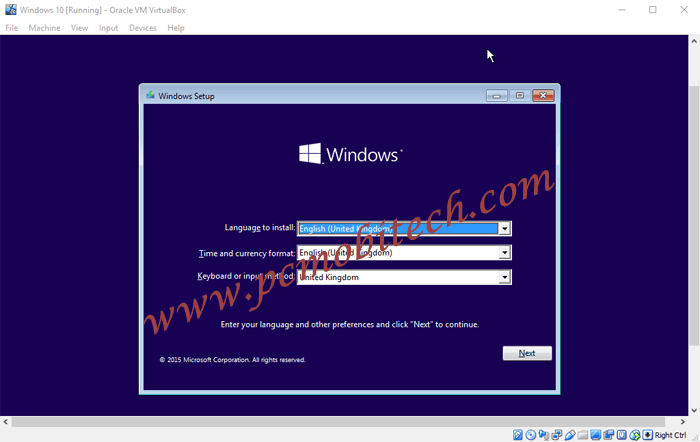
4) Now, Windows Setup will be started and you’ll get Select start-up disk dialog box. Here, you’ll need to select the drive such as DVD or USB Drive or if you only have ISO image file that contains the Operating System files then it can be also manually selected. For ISO image selection you can browse the folder and files using folder icon.
5) Next, you can select the ISO image file via file explorer and click on the Open Button.
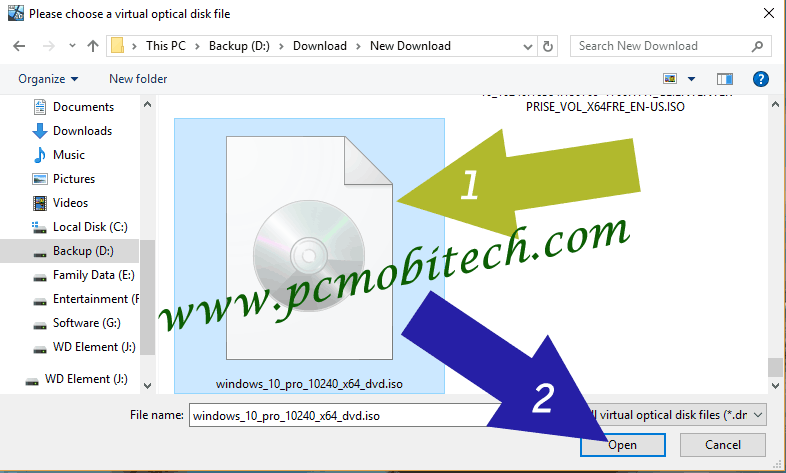
6) Once you made the selection of the drive or ISO image, you can click on the Start button.
7) The OS setup has been started and Now you can easily follow all the steps ahead as you install OS normally on the physical machine.
That’s it, you’ve understood all the steps and can install any OS in VirtualBox as a Guest Operating System. However, if you still have any confusion regarding the setup, please leave a comment reply, we will try to give your queries answer as soon as possible.
You May Also Like:
- How to Enable-disable internet in VirtualBox.
- 3 Easy ways to share files, folders & drives in VirtualBox.
- Virtualbox: Fix the full-screen problem for all OS.
- How to check Remix OS on VirtualBox without USB drive.
- How to use Remix OS bootable USB with Virtualbox
When you purchase through links on our site, we may earn an affiliate commission. Read our Affiliate Policy.


Since you want to install an operating system in the virtual machine, you need to make sure the virtual machine can access the installation media. To do this, you edit the virtual machine settings. In Oracle VM VirtualBox Manager, select the virtual machine and then in the toolbar click the Settings button. The Settings window is displayed. In the navigation on the left, select Storage as shown in Figure 6.9 .