Oracle VM VirtualBox provides the ability to install multiple operating systems (OS) on your single PC without affecting the original OS. This allows easy testing of applications on different platforms such as Windows, Mac OSX, Linux, Ubuntu, Solaris, BSD, IBM, etc. However, file sharing between your main OS and Oracle VM VirtualBox can be a bit challenging for new users. By default, this feature is not enabled in VirtualBox, preventing the sharing of files between the host OS and guest OS. To facilitate file sharing, VirtualBox offers three features: Shared Clipboard, Drag ‘n’ Drop, and Shared Folder.
How to Share Files between the Host OS and VirtualBox Guest OS:
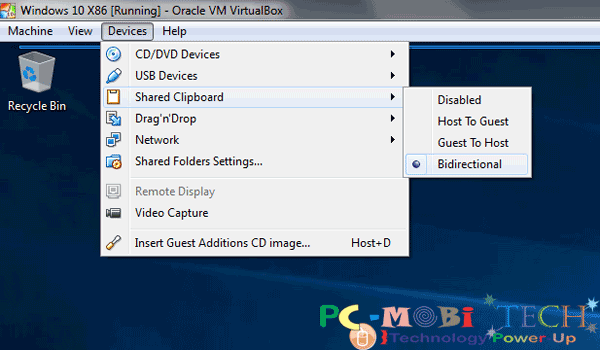
1. Shared Clipboard
This feature enables Clipboard sharing functionality (Cut, Copy, Paste) between your main OS and VirtualBox OS.
To enable this, start your OS in VirtualBox. Once loaded, click on the “Devices” Menu and navigate to the “Shared Clipboard” option, then choose one of the following options:
- Disabled: You can’t use shared clipboard if disabled.
- Host To Guest: Allows cut-copy and sharing files from the main OS into VirtualBox.
- Guest To Host: Enables sharing files from VirtualBox to your main OS.
- Bidirectional: Enables bidirectional sharing, allowing both host to guest and guest to host.
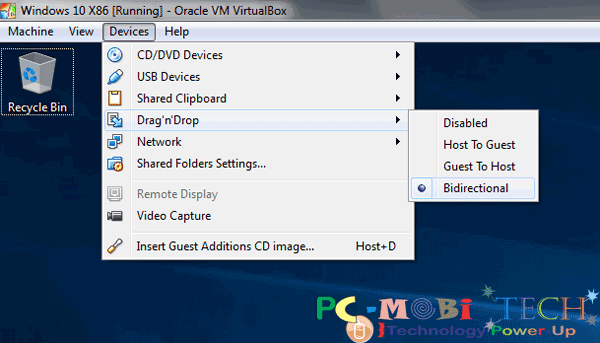
2. Drag’n’Drop
This feature enables drag and drop functionality, allowing you to hold and drag text to drop it in the VirtualBox text editor.
- Disabled: Same as Shared Clipboard feature.
- Host To Guest: Same.
- Guest To Host: Same.
- Bidirectional: Same.
You May Also Like:
- How to Install a Guest OS in Oracle VirtualBox?
- How to Enable-Disable Internet in VirtualBox.
- 3 Easy ways to share files, folders & drives in VirtualBox.
- Virtualbox: Fix full screen problem for all OS.
- How to Record Videos with Oracle VM VirtualBox
3. Shared Folders Settings
The VirtualBox Shared Folder is a great feature that allows you to mount your PC host drives or folders in VirtualBox. This enables you to directly cut, copy, paste, and share files without minimizing VirtualBox. To activate this feature, follow the process below:
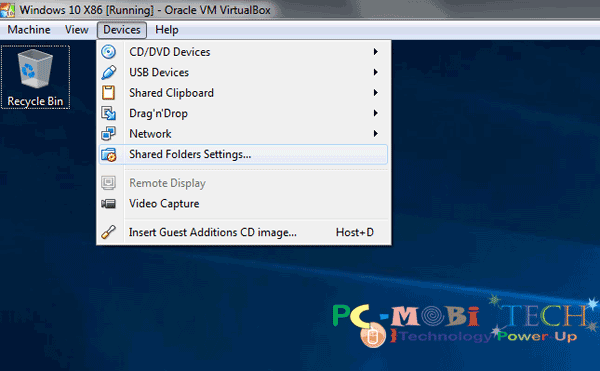
When your operating system is loaded, click on the “Devices” menu, and then select the “Shared Folder Settings…” option.
The “Shared Folders” Settings dialog box will appear. Now, click on the + folder icon, as shown in the screenshot below.
![]()
The “Add Share” dialog box will appear, and fill out the information as follows:
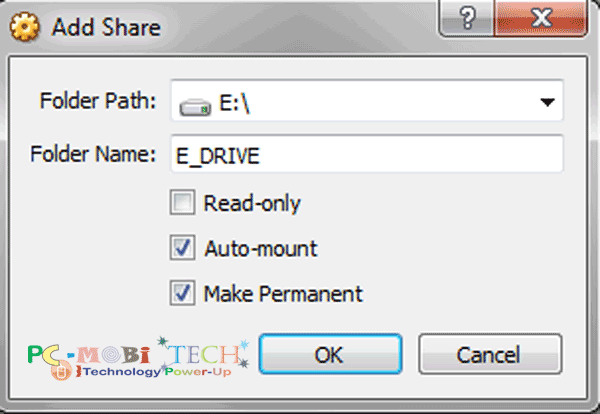
- Folder Path: Type the path of your host drive, indicating which drive or folder you want to share in VirtualBox. Alternatively, you can browse and select your drive or folder path by clicking on the drop-down ∇ icon.
- Folder Name: Enter a name for the drive or folder, e.g., F_drive, Video, Movies, etc.
- Read-only: Use this feature only when you don’t want to enable write permission to the drive or folder and only want to view the folder content.
- Auto-mount: Tick this checkbox. This will automount your drive and folder when you restart your VirtualBox OS.
- Make Permanent: Tick this checkbox; this will allow VirtualBox to attach the drive or folder permanently.
Note: Sometimes these advanced file-sharing features may not work correctly, and in such cases, you’ll need to install VirtualBox Guest Additions software. The Guest Additions software is already present in the “Devices” menu. To install Guest Additions in any VirtualBox OS, follow these steps:
- Click on the “Devices” menu and choose the last “Insert Guest Additions CD image…” option.
- Go to the explorer window, and you will see the Guest Additions ISO attached to the CD drive.
- Double-click on the drive and install the software.
I hope that this article proves helpful to you.
When you purchase through links on our site, we may earn an affiliate commission. Read our Affiliate Policy.