For recording a computer screen, we use a best screen recording software, once the recording completes we can edit the video with any Video Editing software. Recently I bought the MSI RTX 2060 Graphic Card and tried to record videos with many different tools but didn’t get the satisfaction. After some time I found Nvidia offers its own Desktop and Game recording software but it is hidden feature because first you will have to signup for Nvidia account, and after that you can start using the Nvidia Geforce Experience (ShadowPlay) software for live screen recording.
NVIDIA Geforce Experience Screen Recording Steps
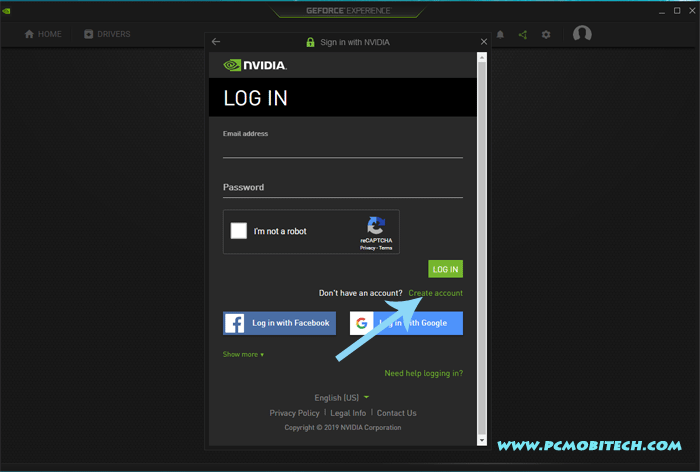
If you want to record videos with NVIDIA Geforce Experience Software, then first you will have to check the Geforce Experience software must be installed in the system, if it is not installed then download from official site. After installing open Geforce Experience and then it will ask you to LOG IN to NVIDIA account. If you have NVIDIA account then you can simply login by entering the EMail Address and Password. If you don’t have, follow the steps below to complete signup for a account.
- When you start GEFORCE EXPERIENCE, you will see below screen. Here you can simply enter the account information and verify the “I’m not a robot” check box and then hit the LOG IN button. In case you have not signed up for the account, it can be created with 3 ways: Log in with Facebook, Log in with Google and Create a new account with Email. Here I’m creating a new account using Email address. If you also want to create account using email, then click on the Create account link.
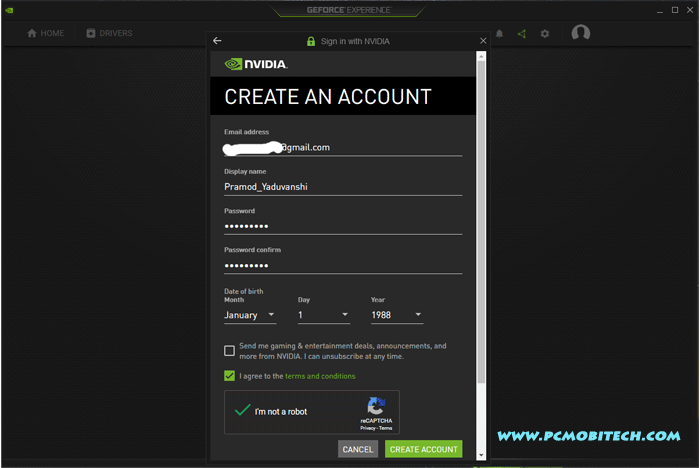
- Next, fill the all required information, such as Email Address, Display Name, Password (You will have to use a combination of at least 3 types of characters:lowercase letters, uppercase letters, symbols, numbers, and letters), Date of birth, and then accept the Terms and Conditions checkbox and verify I’m not a robot confirmation. After filling all the detail, accepting agreement and verification, click on the CREATE ACCOUNT button.
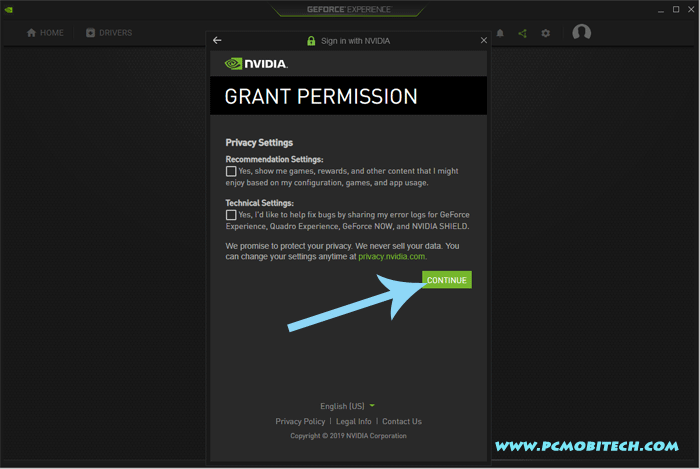
- Now you will see GRANT PERMISSION screen. If you want to allow NVIDIA can use your Privacy and Technical info for improving the users experience and other benefits tick the checkbox, if you don’t want simply uncheck these and click on the CONTINUE button.
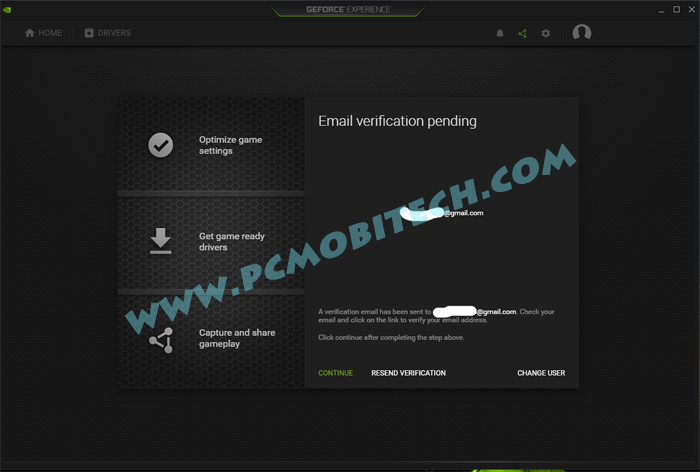
- After clicking on the CONTINUE button, you will see Email verification pending screen. To continue, goto your Email account and click on the verification link. As you as you verified, click on the CONTINUE, If you didn’t received the Email, you can use RESEND VERIFICATION, to receive another verification email, also check for SPAM folder, if the mail is not coming in the Inbox.
- Now NVIDIA account has been successfully created and you can start using it for Recording and Capturing Games or Computer Screen for free.
Start Games Recording using GeForce Experience ShadowPlay
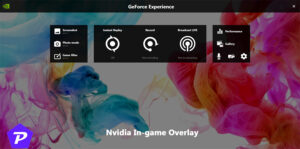
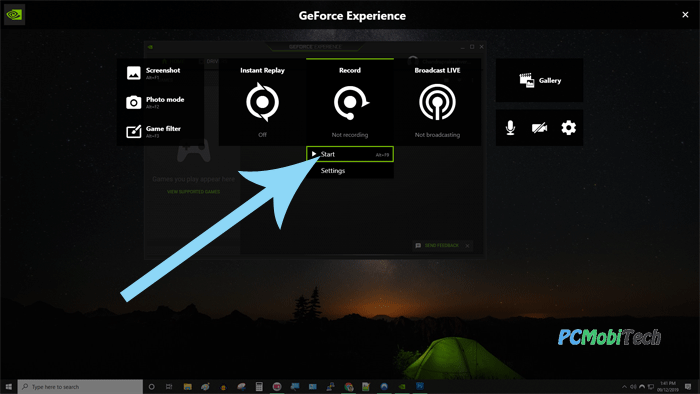
After complete signup you will see main GeForce Experience screen. At the top middle right you will see in-game overlay icon. To see recording related option click on the icon, In-game overlay screen can be also opened by pressing Ctrl + Alt + Z keys together.
![]()
Now you will see the option ›Start option. To start recording Game or Desktop screen, click on the Start option. For starting screen recording you can also you the shortcut key: Alt+F9
After that screen capturing will continue until you don’t stop it using below method.
Stop Recording of NVIDIA GEFORCE EXPERIENCE?
To stop the screen capturing immediately you can use the Shortcut Key: Alt+F9 together, as soon as you press the keys it will automatically stopping recording & save the video.
You May Also Like:
- How to Bring back Microsoft 3D Pinball Game in Windows Vista, 7, 8, 10.
- Run Android Apps/Games on PC With Arc Welder (Chrome Browser)
- Bluestacks- How to Stop Unwanted games download automatically.
- Download & Play Contra, Mario, Bomberman and lots of Old ROM Games in PC.
GeForce Experience Video Recording Settings.
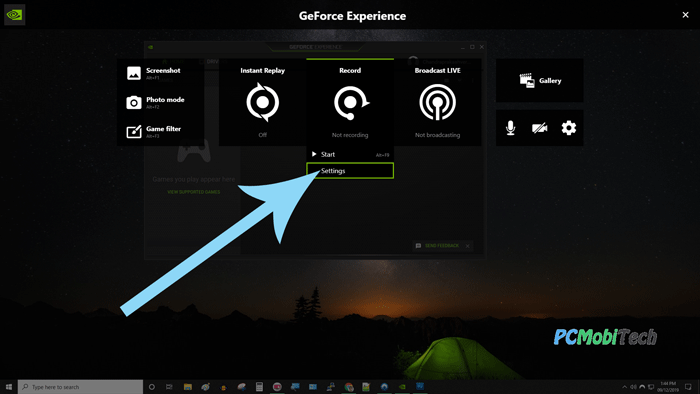
To See Geforce Experience Recording Settings Click on the in-game overlay icon and then click on the Record option and after that you will need to choose Settings option.
Now you will see Video Capture Settings screen, here you can setup Instant Replay Length, Quality and Resolution, Frame rate and Bit rate settings. By default it has 3 quality settings: Low, Medium and High. But you can increase of decrease the Screen Resolution, Frame rate, and Bit rate of the video as according to your need very easily.
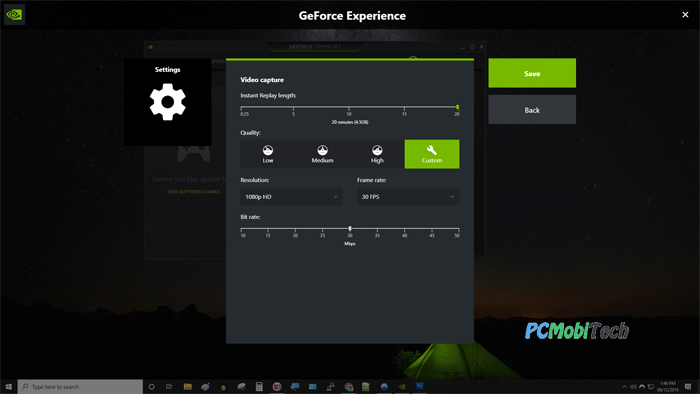
For settings up custom video capturing quality, first select the Resolution of the screen that you’re using and then choose the Frame Rate, and lastly select the Bit rate quality, if you select higher bit rate, the video size will be also increased. So choose medium settings to make balance between the quality and computer speed. I’m saying this because if you select maximum quality, then it will also slow down the game performance a bit. Hence, middle option stables the gaming performance and recording quality.
When you purchase through links on our site, we may earn an affiliate commission. Read our Affiliate Policy.